

You can cut chair time by 30% when you use an Orthodontic Buccal Tube with advanced design. This tool helps you place brackets faster and with less hassle.
- Enjoy quicker appointments
- See happier patients
- Boost your practice’s productivity
Key Takeaways
- Using optimized orthodontic buccal tubes can reduce chair time by 30%, allowing you to see more patients in a day.
- Features like color-coded indicators and pre-angled slots help speed up the placement process, making appointments quicker and more efficient.
- Regular staff training on the use of these tubes enhances workflow and reduces errors, leading to happier patients and a more productive practice.
Orthodontic Buccal Tube: What Makes It Optimized?
Definition and Purpose
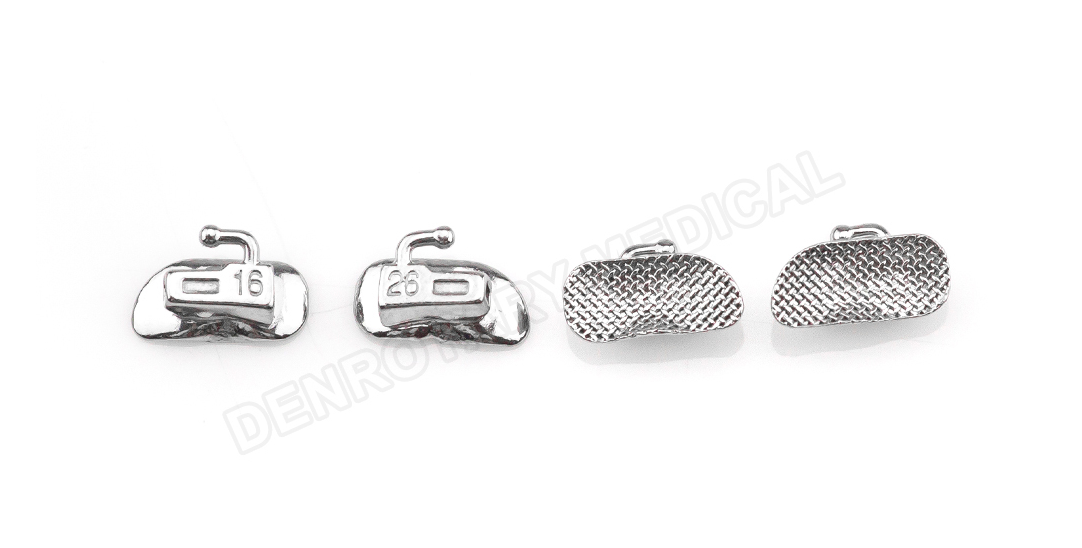
You use an Orthodontic Buccal Tube to hold archwires and other orthodontic parts on the molars. This small device helps guide tooth movement and keeps wires secure during treatment. When you choose an optimized version, you get a tool designed for speed and accuracy. The purpose is to make your work easier and help patients finish treatment faster.
Key Efficiency Features
Optimized Orthodontic Buccal Tubes offer several features that save you time:
- Pre-angled slots help you place wires quickly.
- Smooth edges reduce discomfort for patients.
- Color-coded indicators let you identify the right tube fast.
- Built-in hooks allow you to attach elastics without extra steps.
Tip: You can train your staff to spot these features and use them to speed up appointments.
Comparison to Standard Buccal Tubes
Standard buccal tubes often require more adjustments and can slow down your workflow. Optimized Orthodontic Buccal Tubes fit better and bond faster. You spend less time fixing problems and more time helping patients. The table below shows the main differences:
| Feature | Standard Tube | Optimized Tube |
|---|---|---|
| Placement Time | Longer | Shorter |
| Comfort | Basic | Improved |
| Bond Failure Rate | Higher | Lower |
| Identification | Manual | Color-coded |
You see better results and happier patients when you switch to optimized tubes.
Orthodontic Buccal Tube: Mechanisms for Reducing Chair Time
Streamlined Placement and Bonding
You can save a lot of time when you use an Orthodontic Buccal Tube with a smart design. The tube often comes with features that help you place it quickly and easily. Many tubes have a contoured base that fits the tooth surface. This shape helps you position the tube in the right spot on the first try. You do not need to spend extra minutes adjusting the fit.
Some tubes use color-coded marks. These marks show you where to place the tube. You can train your staff to look for these marks. This step makes the bonding process faster and more accurate.
Tip: Always keep your bonding area dry and clean. This step helps the tube stick better and reduces the chance of bond failure.

Enhanced Fit and Fewer Adjustments
A good fit means you do not need to make many changes after placing the tube. Optimized tubes match the shape of the molar. You can check the fit quickly and move on to the next step. This process saves you time during each appointment.
You will notice that patients feel more comfortable. The smooth edges and low profile of the tube reduce irritation. You do not need to stop and fix sharp spots or rough edges. This comfort means fewer complaints and less time spent on adjustments.
Here is a quick comparison:
| Feature | Standard Tube | Optimized Tube |
|---|---|---|
| Fit Accuracy | Average | High |
| Number of Adjustments | More | Fewer |
| Patient Comfort | Basic | Improved |
Minimizing Bond Failures and Re-appointments
Bond failures can slow down your workflow. Each time a tube comes loose, you need to schedule another visit. This problem takes up valuable chair time and can frustrate your patients.
Optimized Orthodontic Buccal Tubes use better bonding pads and materials. These features help the tube stay in place longer. You do not need to worry about frequent repairs. Your schedule stays on track, and your patients finish treatment faster.
Note: Tracking your bond failure rate helps you see how much time you save with optimized tubes. You can use this data to improve your workflow even more.
Integrating Orthodontic Buccal Tubes into Your Workflow
Step-by-Step Implementation Guide
You can start by reviewing your current bracket placement process. Choose the optimized Orthodontic Buccal Tube that fits your practice needs. Gather all necessary supplies before each appointment.
Follow these steps for a smooth transition:
- Prepare the tooth surface and keep it dry.
- Position the tube using color-coded indicators.
- Bond the tube with the recommended adhesive.
- Check the fit and make sure the tube sits correctly.
- Attach archwires and other components.
Tip: Use a checklist for each appointment to avoid missing steps.
Staff Training Essentials
Train your staff to recognize the features of optimized tubes. Show them how to use color codes and pre-angled slots. Practice placement on models before working with patients.
You can use short training sessions and hands-on demonstrations. Encourage questions and provide feedback after each session.
| Training Activity | Purpose |
|---|---|
| Model Practice | Build confidence |
| Feature Identification | Speed up workflow |
| Feedback Sessions | Improve technique |
Updating Clinical Protocols
Update your clinical protocols to include new placement techniques. Write clear instructions for each step. Share these updates with your team.
Monitor the results and adjust protocols as needed. Track chair time and patient comfort after each change.
Note: Regular protocol reviews help you keep your workflow efficient and up-to-date.
Real-World Results with Optimized Orthodontic Buccal Tubes
Data on Chair Time Reduction
You can see clear results when you switch to an optimized Orthodontic Buccal Tube. Many practices report a 30% drop in chair time per patient. For example, if you spent 30 minutes on a molar tube placement before, you now finish in about 21 minutes. This time savings adds up over a full day. You help more patients and keep your schedule running smoothly.
| Before Optimization | After Optimization |
|---|---|
| 30 min per patient | 21 min per patient |
| 10 patients/day | 14 patients/day |
Note: Tracking your appointment times helps you measure your progress and spot areas for improvement.
Practice Testimonials
Orthodontists share positive feedback about optimized tubes. One doctor says, “I finish appointments faster and my patients notice the difference.” Another practice manager reports, “We see fewer bond failures and less need for emergency visits.” You can ask your team for feedback after making the switch. Their input helps you fine-tune your workflow.
- Faster appointments
- Happier patients
- Fewer repairs
Workflow Comparisons Before and After
You notice big changes in your daily routine. Before, you spent extra time adjusting tubes and fixing bond failures. After switching, you move quickly from placement to archwire attachment. Your staff feels less rushed and your patients spend less time in the chair.
Tip: Compare your workflow steps before and after using optimized tubes. This helps you see where you save the most time.
Practical Tips for Maximizing Efficiency with Orthodontic Buccal Tubes
Choosing the Right Buccal Tube System
You need to select a buccal tube system that matches your practice goals. Look for tubes with color-coded indicators and pre-angled slots. These features help you work faster and reduce mistakes. You should check if the system offers different sizes for various molars. Some brands provide extra comfort with smooth edges and low profiles.
Here is a quick checklist to guide your choice:
- Color-coded for easy identification
- Pre-angled slots for quick placement
- Multiple sizes for better fit
- Smooth edges for patient comfort
Tip: Ask your supplier for samples before you decide. Testing a few options helps you find the best fit for your workflow.
Continuous Staff Education
You must train your staff regularly to keep everyone up to date. Hold short workshops or hands-on sessions every month. Use models to practice placement and bonding. Encourage your team to share tips and ask questions.
A simple training plan might look like this:
| Activity | Frequency | Goal |
|---|---|---|
| Hands-on Practice | Monthly | Improve technique |
| Feature Review | Quarterly | Spot new features |
| Feedback Session | After change | Address concerns |
Note: Well-trained staff work faster and make fewer mistakes.
Tracking and Measuring Results
You should track your progress to see real improvements. Record chair time for each appointment. Monitor bond failure rates and patient comfort scores. Use this data to adjust your workflow.
Try this simple method:
- Record appointment times in a spreadsheet.
- Note any bond failures or extra adjustments.
- Review results every month.
Post time: Sep-03-2025